Wednesday, July 15, 2020

Converting Wood Mount Stamps to Clear Mount


Supplies, in addition to the stamp set being converted:
Small scissors
Tombow Multi Liquid Glue 
Small paint brush to apply glue
StazOn Black inkpad *
White tissue paper *
4 Gauge clear vinyl (found in fabric stores if you choose to not re-use the original clear sticker)


Carefully remove the stamps from the wood blocks by slowly peeling the stamp with the foam away from the block. If you find it does not peel easily you can place your wood block in the microwave in 10 second increments until the glue warms enough that you may easily peel the stamp away from the block. Please be cautious that the block does not become too warm and burn your hands. I always leave the foam attached to my stamps whereas some stampers will remove it or replace it with new foam. It is purely personal preference.


I prefer using the stickers on my stamps. There are 2 options for placing the image on the foam.
·      You can gently peel the clear sticker from the wood block or use StazON black ink to stamp the image on a piece of ordinary white tissue paper. Again this is personal preference.

  Original clear sticker peeled from the block
 Stamped image on plain tissue paper          
                           
 Apply a thin coat to Tombow Multi Liquid Glue then apply the original clear sticker or the stamped tissue paper to the gray foam. Trim the excess sticker or tissue.


I purchased a roll of 4 gauge clear vinyl from Joann’s, a 54” wide yard was only $2.99 and I had a 50% off coupon…that’s a lot of vinyl for $1.60 with tax! Cut a small piece to place over the tissue paper stamped image, this is what will make your stamp a clear mount.


The stamp on the left is the tissue paper stamped image with a piece of clear vinyl adhered with a thin layer of Tombow Multi Liquid Glue. The stamp on the right has the original Stampin’ Up! sticker adhered with a thin layer of Tombow. Trim the excess vinyl or sticker paper.


The final step is to apply a thin layer of the Tombow and let it dry which gives your stamp a repositionable bond to use on your clear acrylic blocks. I do this for all my clear mount stamps and I never have to worry about a stamp accidentally falling off a block while I am using it.


Thursday, January 14, 2016

Well goodness, off track already.....missed day 3 in posting some cards but here we go.... I just love that fat Fluffles cat from Stampendous, he is so cute! The other 2 cards are using products from Stampin' Up! The card with the various sized dots is using the embedded embossing technique


Thanks for stopping in, have a great day!

Tuesday, January 12, 2016

More Birthday Cards

Day 2....more birthday cards using a variety of Stampin' Up! products, new and retired, as well as products from Great Impressions stamps and Sizzix. As I mentioned in yesterday's post, most of my cards are CASEd, but I have the most awful problem remembering who I CASEd the card from and goodness only knows if I wrote it down that piece of paper has long since been lost, ha! ha! If you see one of creations CASEd just let me know and I would be happy to insert your credits. When I was in the flurry of making these 45 (give or take a few) birthday cards I found most of the samples on Pinterest...oh my gosh that place is like a black hole for me....I could spend hours just looking at all the wonderful creations and if I ever created all the cards I have pinned I would NEVER get anything else done again...ever :-) Thanks for stopping by and Happy Crafting!


Monday, January 11, 2016

It's Been A Long Time.......

Wow, 3 years......sure is a long time in between blog posts. Since I am not one to make New Year's resolutions I will tell myself I just need to be more proactive in posting to my blog. I have a whole series of birthday cards that I have the good intentions of posting , hopefully on a consistent basis, and perhaps this will also kick start me into using a little time here and there to make more new creations. Most of the cards I will be posting in this series are Stampin' Up! based products, but recently I had an incredible urge to pull out my contraband inventory of stamps and papers so your will see a mixture of stamp manufacturers.....I have to use it or fear being on an episode of Hoarders, ha! ha! Thanks for stopping by :-)


Tuesday, May 7, 2013

Blitsy Giveaway

Blitsy is always sponsoring giveaways and today it's Tim Holtz. Check it out at http://www.blitsycrafts.com/2013/05/its-giveaway-time.html

Great tools to create the popular vintage look on cards or scrapbook pages.

Tuesday, January 8, 2013

Small Agrrevations

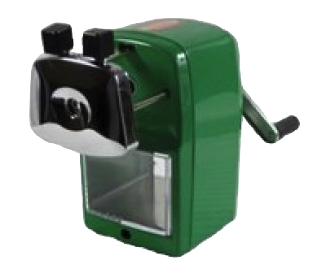
This is definitely off the stamping and scrapping topic, but all I wanted to do was sharpen a pencil. By the time I was done using my electric sharpener I was the proud owner of one pencil nub, ugh!! Then I was lead (no pun intended, I think) to google the best pencil sharpener ever and this is what I found. All the reviews are glowing and then I find out there is a contest to giveaway one of these colorful beauties. If you Pin It, Tweet It, or Blog Post It you can earn extra entries, so this is where we are.....Well, I don't believe I will wait for the contest to be over before I have one, but if I am lucky enough to win I will be re-gifting to one of my boys' teachers. When it is all said and done there will be one less annoying, ill-sharpening  pencil sharpener in this world!

If you are interested in one of these check out the website here: http://www.classroomfriendlysupplies.com/pages/about-us

Oh yea, I forgot to mention they come in the the green as above, blue, red, and black...pretty cool!

Tuesday, November 20, 2012

Single Stamps Now Available!

How many times have we all looked at a stamp set and have fallen in love with just one image or one saying? Well Stampin' Up! has heard us and has now made available until January 22, 2013 a selection of single stamps from some of our favorite sets as well as some never seen before images. Click on the links to see the single stamps sayings from Perfectly Penned, Seasonal Sayings and Word Play as well as single stamp images in Assortment 1 and Assortment 2 that has 2 never before seen images. You can order directly from my Online Store, email  or call me if I can help you with your order. Happy shopping and stamping!

Tuesday, June 5, 2012

Explosion Box Round 2


A couple of weeks ago I got a call from my mother-in-law. She had seen the previous explosion box I had made and wondered if I had time to make one as a gift for a friend's surprise 70th birthday luncheon. Well, of course I said I would...what crafter would turn down an opportunity to play, right? I started by using the Build a Blossom punch creating a Bashful Blue flower with an Antique Button center to adorn the box lid.


I dug through my embarrassingly large stash of DSP and found the patterned Bashful Blue from a few year back. I wanted to leave some pages fairly plain so the birthday lady could add pictures of her luncheon.


I pulled out a variety of stamp sets, current, retired and those about to retire to decorate many of the flaps. On this one I used the recently retired Pocket Silhouettes.


I also tried mixing different stamped images and sentiments from various sets on this project. Of course, now that I have put away all the sets I used on this box I find myself at a loss for remembering the sets I used on this flap. Perhaps when I find myself with nothing to do I can go back and and dig them out to insert the names.....yep, I know...good luck with finding that time. 


The Language of Friendship set. I put off purchasing this set even though I had seen so many beautiful projects with it so thank goodness for Sale A Bration because this was one of my freebies.


The butterfly is from the Summer Solstice set; the flowers and sentiment not so sure. Another project for when I find those few minutes of spare time.


Another part of the Summer Solstice set.


Faith in Nature hostess set 2011-2012


Elements of  Style colored with ink and the Aqua Painters. I then used the Illuminate Top Coat Smooch Pearlized Accent Ink. The shimmer does not come through in the photo that well, but it looks  lovely in person. The pearl accents were an after thought... that is after I managed to get an ink smudge on the upper corner that needed to be camouflaged.

My MIL told me her friend just loved the box and all the other ladies were taking pictures as they passed it around the luncheon table. I don't think I could ask for a bigger compliment!

Thanks for taking the time to stop by to see my creations.

Saturday, March 31, 2012

Sweet Daisy Mae

This coming Wednesday will mark 2 weeks since we had to say good-bye to our sweet border collie Daisy. She was with us for 12 years and was an absolute doll!! That dog loved to chase after sticks; we always joked that her leg would be hanging on by a ligament and she would still go full bore. Well, now she is chasing those sticks across the Rainbow Bridge. I made this card for the doctors and staff at our vet's office to say thanks for the love and care they always gave to our girl. Shhhhh, I know it's not Stampin' Up! and I won't post the name but I got it at one of those big box stores. Can you believe I did not have any dog (or cat for that matter) stamps in my inventory? Unbelievable! This is a CASE with a couple of minor changes. Of course, once again, I did not jot down the name of the original creator or blog so if this is yours let me know so I can post credit. I did use Stampin' Up! cardstock in Crumbcake, Early Espresso, and Melon Mambo along with retired MM ribbon


And here she is, the wonderful Sweet Daisy Mae! She turned 12 this past February, which for us is short....our mini dachshund, Dollie, was 18 (1991-2009) and our kitty Sneakers was 21 (1987-2008). The house has been really quiet. We could always tell when Daisy was around as she was not the most graceful of dogs when it came to laying down....she would always kind of flop down with a resounding thump. Laughingly we would call her "Grace".


And who ever said cats and dogs don't get along? My 2 snugglers in action. Daisy and Sneakers became fast friends when Daisy came into our family.


And finally, a dog and her boy.....My youngest son, Ethan would love on Daisy sooooo much and she would just take it. Sometimes she would look up at you and you could just tell she was thinking "Okay, that's enough love for now." I think Ethan was always a bit disappointed that Daisy wouldn't sleep on his bed with him, but she tended to be hot natured. The only time she really ever slept with any of us is when someone was sick and in our queen size bed. There apparently was enough room for the sick body and the sprawled out collie. That was one of the sweetest things about this old girl, she knew when you didn't feel well and was willing to stay by
 your side until things were better.

Thanks for stopping by and checking out the contraband card. I will actually have another to post in the next day or so; a belated birthday card for my son's third grade teacher. Enjoy the rest of the weekend!

Thursday, March 8, 2012

Explosion Box


This is my first Explosion Box ever and even though I tend to be my own worst critic....I love it! This little box is such a neat way to keep memories of a special event. For the past several years a friend has asked me to make a favor or memento for a father-daughter dance called the Princess Ball at her church.  Our beautiful Poppy Parade is a perfect match for the red sashes that are being used in their color scheme.


I got to use so many different products while creating this box and many for the first time. I am so bad about ordering a product I think I am just going to love and then it takes me forever to actually pull it out of the packaging....please tell me I am not the only one! Although I had put my Mixed Bunch stamp set and coordinating punch to use previously, I have been sitting on the Textured Impressions Designer Frames. Why? It makes such a beautiful presentation and I will be using it a lot more often.


One of my Sale-A-Bration goodies, Language of Friendship. When I first saw this set I thought it was okay, but nothing I really had to have. Then thanks to all the creative ladies that so graciously post their work  online I found myself really wanting it.


On the top flap you can see where I used the new Framlits Labels Collection....I am liking these too! It may just be me, but I wish the nesting sizes were a tad bit closer in size. I like the matting that I did on the top flap, but I think I would have liked the black label to be just a bit smaller. I'm sure the dies are sized this way for a reason, but a girl can always wish :-)

Last but not least, I have finally cracked open one of several pads of In Color DSP from the Hostess Benefits to add a little pop to the blank flaps. When I originally put the box together I did not have the scalloped trim around the bottom of the lid. I looked at it for a couple of days and each time I just knew it needed something, it was too plain. I punched a couple of different borders and then decided upon the Scallop Trim Border, cut it about 1 1/4" wide and adhered to the inside of the lid and all of the sudden my explosion box was done.

I know most of the explosion box samples I have seen online started with 12"x12" paper, but since you can't get 12"x12" Poppy Parade only, I opted to go with a smaller size. I started with 8.5"x8.5" and scored at 2.75" and 5.75". Each subsequent layer was cut .25" smaller, but scored the same. The girls will be able to add small pictures and/or journaling on the flaps that range in size from 3", 2.75", 2.5" by 2.75". The reverse side of each embellished flap was left blank for the girls to customize.

I met with my friend last night to show her the sample even though I had already emailed her pictures. Her first comment was "the pictures do not do justice to this box"; what a lovely compliment! Well I am now off to start making 20 of these little beauties. Thanks for stopping by and checking out my newest project, have a great day!

Saturday, February 18, 2012

Belated Birthday

 I have got to get busy and start crafting some more cards now that I am about done posting my latest creations. Can I please have about 12 extra hours per day? I know, don't we all wish there was more time to hide away in our craft rooms, or as in my case crowd the dining room table with my vast inventory of products :-) Bless my husband's heart he rarely says anything about it...love him!!

I also love this Mixed Bunch stamp set. As usual I was running behind on a birthday gift that was
already considerably belated so I had to go fairly simple. I have seen so many beautiful cards done with this set.
 

My upline did a tutorial on a card like this using the My Friend set and I  liked it so much I decided to CASE it. The only change I did was to add some Dazzling Diamonds to the White Embossing Powder to get a little extra shimmer. 


I know, here she goes again with that Because I Care set, but I'll say it again.....I really love that set!


Back to that Mixed Bunch set. I told you I was pressed for time so not only did I do simple, but repeats with minor color changes. The first set had Pear Pizazz centers on the flowers and here we have Baja Breeze. I am thinking next time I create one like this I bump it up a notch with some background embossing.


Well, I learned my lesson with this set of cards. I asked my 6 year old what was his teacher's favorite color. He proudly and definitively stated "purple and pink!" So I tried to follow that color scheme throughout this set of gift cards. Just recently I found out her favorite color is green....uh-oh. I find that a tad bit funny, because that is my son's favorite color as well; perhaps he just was helping his teacher expand her horizons on other color choices.


Finally, another Because I Care and in pink, but at least there is some green on the card!

As always, thanks for stopping by!